本篇文章分析的源码地址为:https://github.com/ethereum/go-ethereum
分支:master
commit id: 257bfff316e4efb8952fbeb67c91f86af579cb0a
引言
在ethash的理论介绍篇中,我们介绍了ethash模块的设计思想和实现原理。那么本篇文章,我们就来一起看看它的源代码吧。
这篇文章里,我们将先对ethash模块的目录和源代码文件进行一个简要的介绍。然后重点介绍一下ethash模块的一些重要功能。如果你没有读过ethash的理论介绍篇,可能会对本文中的一些术语(如cache和dataset)感到陌生,如果发生这种情况,建议你浏览一下那篇文章。
我们使用的是go语言实现的go-ethereum项目,在写这篇文章时,我参考的是master分支,commit id为257bfff316e4efb8952fbeb67c91f86af579cb0a。
目录结构
ethash模块位于以太坊项目目录下的consensus/ethash目录下。此目录的结构比较简单,没有其它目录,只有几个源代码文件。下面我们简单说明一下各源码文件所包含代码的功能。
- algorithm.go
此文件里的代码实现了Dagger-Hashimoto算法的所有功能,比如生成cache和dataset、根据Header和Nonce计算挖矿哈希等。 - api.go
此文件的代码实现了供RPC使用的api方法。 - consensus.go
此文件中的代码实现了以太坊共识接口的部分方法,包括Verify系列方法(VerifyHeader、VerifySeal等)、Prepare和Finalize、CalcDifficulty、Author、SealHash。 - ethash.go
此文件中的代码实现了cache结构体和dataset结构体及它们各自的方法、MakeCache/MakeDataset函数、Ethash对象的New函数,和Ethash的内部方法。 - sealer.go
此文件中的代码实现了共识接口的Seal方法,和Ethash的内部方法mine。这些方法实现了ethash的挖矿功能。
生成cache数据和dataset数据
在ethash中,分别定义了cache结构体和dataset结构体,用来管理对应的数据。这两个的结构体字段是类似的,它们在代码中定义如下:
type cache struct {
  epoch uint64    // Epoch for which this cache is relevant
  dump  *os.File  // File descriptor of the memory mapped cache
  mmap  mmap.MMap // Memory map itself to unmap before releasing
  cache []uint32  // The actual cache data content (may be memory mapped)
  once  sync.Once // Ensures the cache is generated only once
}

type dataset struct {
  epoch   uint64    // Epoch for which this cache is relevant
  dump    *os.File  // File descriptor of the memory mapped cache
  mmap    mmap.MMap // Memory map itself to unmap before releasing
  dataset []uint32  // The actual cache data content
  once    sync.Once // Ensures the cache is generated only once
  done    uint32    // Atomic flag to determine generation status
}
(由于这两个结构体的名字和我们使用的cache和dataset是重合的,因此后面的描述中,我们使用 cache数据 和 dataset数据 来特指数据;使用 cache结构体 和 dataset结构体 来指代结构体)
cache数据和dataset数据不仅存在于内存中,还可以被保存在磁盘文件中。当内存中的数据不存在时,会先查找一下磁盘文件中是否有数据,如果有则直接读取,不需再生成。dump和mmap两个字段就是用来从磁盘文件中读写数据的。文件读写比较简单,因此下面的描述和流程图中,我都忽略了这部分内容。文件的路径和格式在这篇文章中有说明,感兴趣的读者可以参看一下。
我们先来看一下两种数据的生成流程:
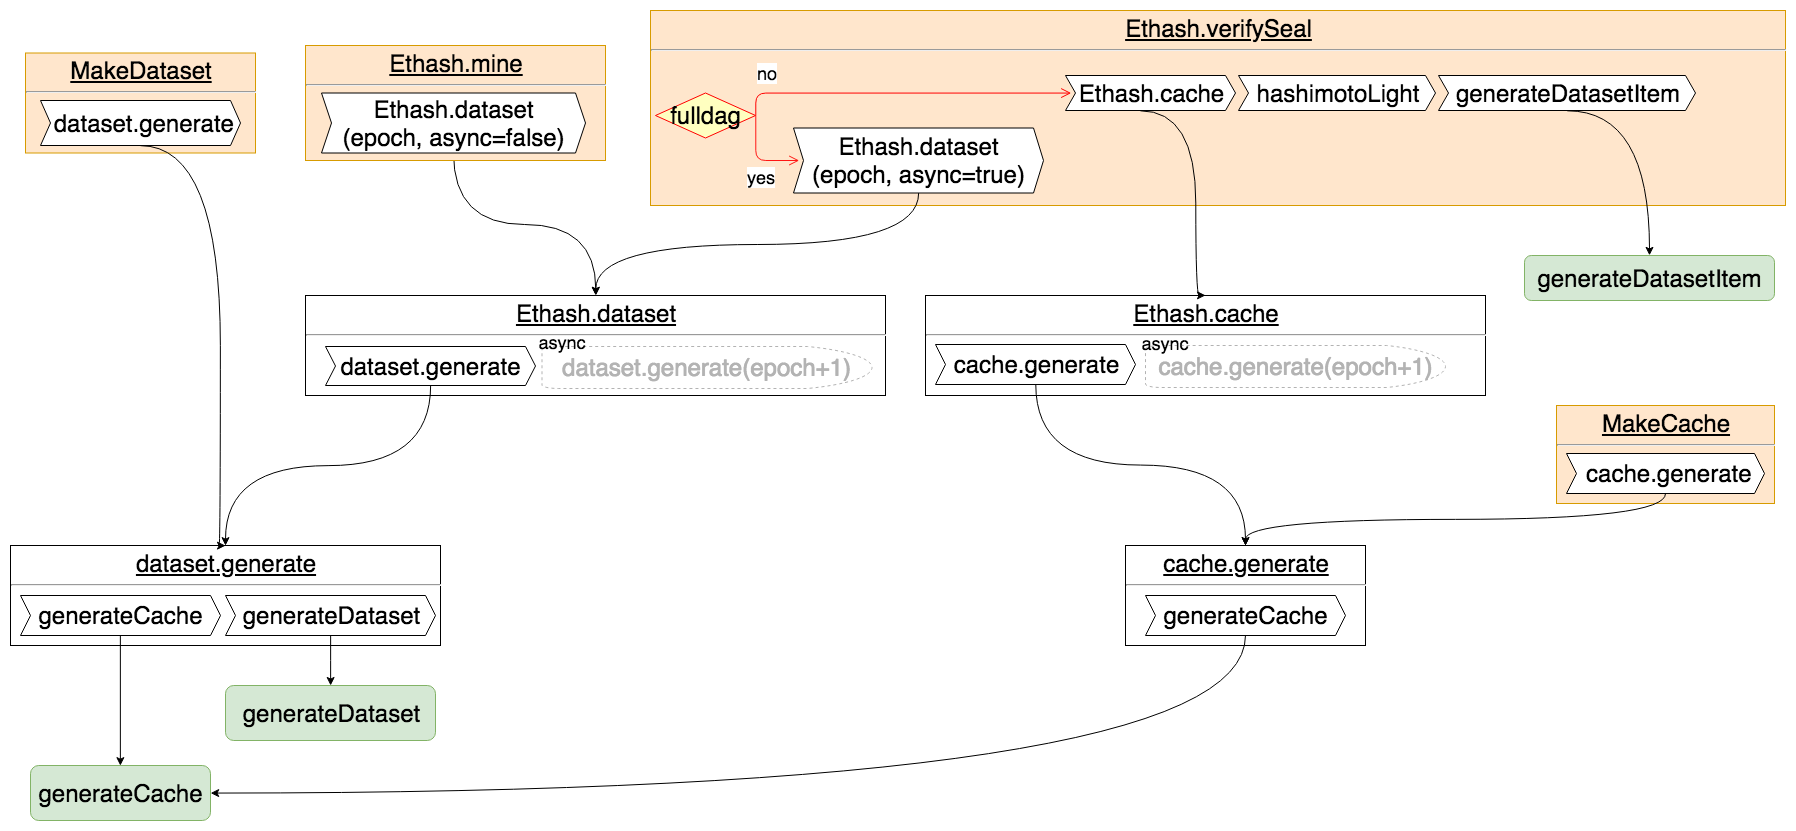
可以看到,cache数据和dataset数据的生成入口有四个:MakeCache函数、MakeDataset函数、Ethash.mine和Ethash.verifySeal。其中MakeCache和MakeDataset被外部模块(geth的makecache和makedag命令)调用;Ethash.mine在给新的区块签名(挖矿,后面会有介绍)时调用;Ethash.verifySeal在验证区块签名时调用。
所有的调用流程中,最后都会归到 generateCache 和 generateDataset 两个函数中(generateDataset中也会调用generateDatasetItem,图中未给出示意)。这两个函数也是生成cache数据和dataset数据算法的真正实现,因此我们详细看一下这两个函数。
我们先来看一下精简后的代码。下面的代码中,我只保留的generateCache函数中的主要代码,以便可以更清晰地理清其算法和逻辑:
func generateCache(dest []uint32, epoch uint64, seed []byte) {
  // Convert our destination slice to a byte buffer
  cache := convert_to_byte_slice(dest)

  // Calculate the number of theoretical rows (we'll store in one buffer nonetheless)
  size := uint64(len(cache))
  rows := int(size) / hashBytes

  // Create a hasher to reuse between invocations
  keccak512 := makeHasher(sha3.NewLegacyKeccak512())

  // Sequentially produce the initial dataset
  keccak512(cache, seed)
  for offset := uint64(hashBytes); offset < size; offset += hashBytes {
    keccak512(cache[offset:], cache[offset-hashBytes:offset])
  }

  // Use a low-round version of randmemohash
  temp := make([]byte, hashBytes)

  for i := 0; i < cacheRounds; i++ {
    for j := 0; j < rows; j++ {
      var (
        srcOff = ((j - 1 + rows) % rows) * hashBytes
        dstOff = j * hashBytes
        xorOff = (binary.LittleEndian.Uint32(cache[dstOff:]) % uint32(rows)) * hashBytes
      )
      bitutil.XORBytes(temp, cache[srcOff:srcOff+hashBytes], cache[xorOff:xorOff+hashBytes])
      keccak512(cache[dstOff:], temp)
    }
  }
}
通过这段精简的代码可以看到,generateCache的主要逻辑在两个for循环中。并且虽然cache变量的类型是[]byte,但整个运算是以hashBytes大小为单位的。hashBytes的值为64,也就是一个keccak512哈希的长度。也正是因为这个原因,代码中的一些索引的计算才显得比较复杂,这觉得这里如果把dest转换成[hashBytes]byte组成的数组代码会更清晰。因此我们下面的分析中提到的item,指的就是hashBytes大小的一个byte数组。
第一个for循环是对cache的初始化:首先将seed的哈希填入cache的第一个item;随后使用前一个item的哈希,填充后一个item。
第二个for循环是对cache数据的“加强”。其逻辑为对于每一个item(srcOff),“随机”选一个item(xorOff)与其进行异或运算;将运算结果的哈希写入dstOff中。这个运算逻辑将进行cacheRounds次。
在第二个for循环中有两个需要注意的地方:
- 一是
srcOff是从尾部向头部变化的,而dstOff是从头部向尾部变化的。并且它俩是对应的,即当srcOff代表倒数第x个item时,dstOff则代表正数第x个item。 - 二是
xorOff的选取。注意我们刚才的“随机”是打了引号的。xorOff的值看似随机,因为在给出seed之前,你无法知道xorOff的值是多少;但一旦seed的值确定了,那么每一次xorOff的值都是确定的。而seed的值是由区块的高度决定的。这也是同一个epoch内总是能得到相同cache数据的原因。
下面我们再来看看generateDataset精简后的代码:
func generateDataset(dest []uint32, epoch uint64, cache []uint32) {
  dataset := convert_to_byte_slice(dest)
  size := uint64(len(dataset))

  // Generate the dataset on many goroutines since it takes a while
  threads := runtime.NumCPU()
  var pend sync.WaitGroup
  pend.Add(threads)

  for i := 0; i < threads; i++ {
    go func(id int) {
      defer pend.Done()

      // Create a hasher to reuse between invocations
      keccak512 := makeHasher(sha3.NewLegacyKeccak512())

      //计算当前线程需要生成的数据项的起始和结束索引
      batch := uint32((size + hashBytes*uint64(threads) - 1) / (hashBytes * uint64(threads)))
      first := uint32(id) * batch
      limit := first + batch
      if limit > uint32(size/hashBytes) {
        limit = uint32(size / hashBytes)
      }

      //dataset的主要生成逻辑在这里
      for index := first; index < limit; index++ {
        item := generateDatasetItem(cache, index, keccak512)
        if swapped {
          swap(item)
        }
        copy(dataset[index*hashBytes:], item)
      }
    }(i)
  }
  // Wait for all the generators to finish and return
  pend.Wait()
}
从这段精简的代码可以看到,dataset数据的生成逻辑主要在最后面最内部的那个for循环里。由于dataset数据比较大,因此generateDataset将数据切成了几段,使用多个线程同时生成,first和limit就是为了计算当前线程应该生成哪段数据。同generateCache类似,dataset变量的类型为[]byte,但整数运算也是以hashBytes为单位进行的。这同样导致了一些索引计算的复杂性(如batch的计算)。
generateDataset函数其实比较简单,所有dataset数据生成相关的代码其实在generateDatasetItem中。所以我们再来看看generateDatasetItem函数的代码。由于这个函数比较“硬”没什么可精简的,并且又有些稍长,所以我们分段来看此函数。
首先看一下函数的开始部分:
func generateDatasetItem(cache []uint32, index uint32, keccak512 hasher) []byte {
  // Calculate the number of theoretical rows (we use one buffer nonetheless)
  rows := uint32(len(cache) / hashWords)

  // Initialize the mix
  mix := make([]byte, hashBytes)

  binary.LittleEndian.PutUint32(mix, cache[(index%rows)*hashWords]^index)
  for i := 1; i < hashWords; i++ {
    binary.LittleEndian.PutUint32(mix[i*4:], cache[(index%rows)*hashWords+uint32(i)])
  }
  keccak512(mix, mix)

  ......
}
generateDatasetItem的第一个参数就是cache,这是因为dataset数据的计算来源是cache数据;第二个参数代表的是将生成的item是第几个item。函数最终要得到的值存储在mix变量中,主要通过几个for循环生成。下面我们挨个看一下。
这段代码中的for循环是第一个for循环,功能是对mix变量进行初始化,其初始化值来自于cache。其中hashWords代表的是一个hash里有多少个word值:一个hash的长度为hashBytes即64字节,一个word(uint32类型)的长度为4字节,因此hashWords值为16。选取cache中的哪一项数据是由参数index和i变量决定的。
接下来是函数的中间部分,它包含了两个for循环:
func generateDatasetItem(cache []uint32, index uint32, keccak512 hasher) []byte {
  ......

  intMix := make([]uint32, hashWords)
  for i := 0; i < len(intMix); i++ {
    intMix[i] = binary.LittleEndian.Uint32(mix[i*4:])
  }
  // fnv it with a lot of random cache nodes based on index
  for i := uint32(0); i < datasetParents; i++ {
    parent := fnv(index^i, intMix[i%16]) % rows
    fnvHash(intMix, cache[parent*hashWords:])
  }

  ......
}
这段代码中的第一个for循坏没有实质的计算,只是将mix转换成[]uint32类型,并将其转存到intMix中。
代码中的第二个for循环是对intMix的“强化”。方法是利用index参数和i变量计算出一个cache数据的索引,然后将这个cache数据合入intMix中。fnv和fnvHash被称作聚合函数,我们稍后再介绍。
然后我们再来看一下函数的最后一部分:
func generateDatasetItem(cache []uint32, index uint32, keccak512 hasher) []byte {
  ......

  for i, val := range intMix {
    binary.LittleEndian.PutUint32(mix[i*4:], val)
  }

  keccak512(mix, mix)
  return mix
}
最后一个for循环将intMix又恢复成mix。最后计算mix的哈希后,返回计算后的哈希值。
下面我们将整个函数的代码放在一起,方便我们从整体上了解generateDatasetItem函数:
func generateDatasetItem(cache []uint32, index uint32, keccak512 hasher) []byte {
  // Calculate the number of theoretical rows (we use one buffer nonetheless)
  rows := uint32(len(cache) / hashWords)

  // Initialize the mix
  mix := make([]byte, hashBytes)

  binary.LittleEndian.PutUint32(mix, cache[(index%rows)*hashWords]^index)
  for i := 1; i < hashWords; i++ {
    binary.LittleEndian.PutUint32(mix[i*4:], cache[(index%rows)*hashWords+uint32(i)])
  }
  keccak512(mix, mix)

  // Convert the mix to uint32s to avoid constant bit shifting
  intMix := make([]uint32, hashWords)
  for i := 0; i < len(intMix); i++ {
    intMix[i] = binary.LittleEndian.Uint32(mix[i*4:])
  }
  // fnv it with a lot of random cache nodes based on index
  for i := uint32(0); i < datasetParents; i++ {
    parent := fnv(index^i, intMix[i%16]) % rows
    fnvHash(intMix, cache[parent*hashWords:])
  }

  // Flatten the uint32 mix into a binary one and return
  for i, val := range intMix {
    binary.LittleEndian.PutUint32(mix[i*4:], val)
  }

  keccak512(mix, mix)
  return mix
}
接下来我们再稍微说明一下fnv和fnvHash两个函数。它们的定义如下:
func fnv(a, b uint32) uint32 {
  return a*0x01000193 ^ b
}

func fnvHash(mix []uint32, data []uint32) {
  for i := 0; i < len(mix); i++ {
    mix[i] = mix[i]*0x01000193 ^ data[i]
  }
}
这俩函数被称为“聚合函数”,作用就是将两个数或slince整合在一起。函数不复杂,可以看到整合的方法是很简单的。fnv算法其实是有理论基础的,我没有认真的学习这块内容,所以这里也就不多讲了,感兴趣的读者可以看一下维基百科上的说明,或者使用“fnv 算法”等关键词自己搜索。
以上就是生成cache数据和dataset数据的流程和代码,generateCache和generateDataset是实现Dagger算法的核心函数。其实乍看到这个函数,我是有点头大的;再加上网上的资料都在讲Dagger算法和”DAG”、”有向无环图”这些概念和名词,让人觉得很高深很复杂。但幸好这俩函数不长,耐心看下来发现其实是非常容易理解的。所以我决定在自己的文章里不再总提这些概念,有兴趣的读者可以使用相关关键字自行搜索。至于“有向无环图”这个概念,通读代码下来我是没怎么发现有太多相关的代码逻辑,唯一相关的就是生成的dataset数据的tiem时,cache数据中的item可以看作是其父项。
动态调整Header.Difficulty
在理论篇里我们介绍过,难度是需要动态调整的。在ethash模块中,当前区块的难度是通过CalcDifficulty函数计算得到的,其值保存在Header.Difficulty字段中。调用CalcDifficulty函数的地方有Ethash.verifyHeader和Ethash.Prepare,即在生成和验证区块时都要计算一下区块的难度值。
我们来看一下CalcDifficulty函数的实现:
func CalcDifficulty(config *params.ChainConfig, time uint64, parent *types.Header) *big.Int {
  next := new(big.Int).Add(parent.Number, big1)
  switch {
  case config.IsConstantinople(next):
    return calcDifficultyConstantinople(time, parent)
  case config.IsByzantium(next):
    return calcDifficultyByzantium(time, parent)
  case config.IsHomestead(next):
    return calcDifficultyHomestead(time, parent)
  default:
    return calcDifficultyFrontier(time, parent)
  }
}
函数的time参数是当前区块的Header.Time字段;parent参数是当前区块的父块。很明显这个函数的功能就是根据区块高度的不同,调用不同的计算难度的算法。在理论篇里我们对以太坊中难度计算的不同方式以及原因进行了详细的说明,从这段代码里也能看出来,各个case分叉与我们的说明是一一对应的。由于每个case分叉里的calcDifficultyXXX函数都仅仅是实现计算难度公式的代码,而这些公式我们在理论篇里已经进行了详细的说明,因此这里就不再一一介绍相关的代码实现了。
需要稍微注意一下的是,每个calcDifficultyXXX函数都只用到了区块的高度和时间差,且所有计算是确定性的。因此在生成某一区块时计算得到的难度值,验证时针对这个区块再次进行计算也肯定是一样的。
挖矿
在介绍clique模块的文章中,有一幅示意挖矿过程的流程图,我们简化一下放到这里:
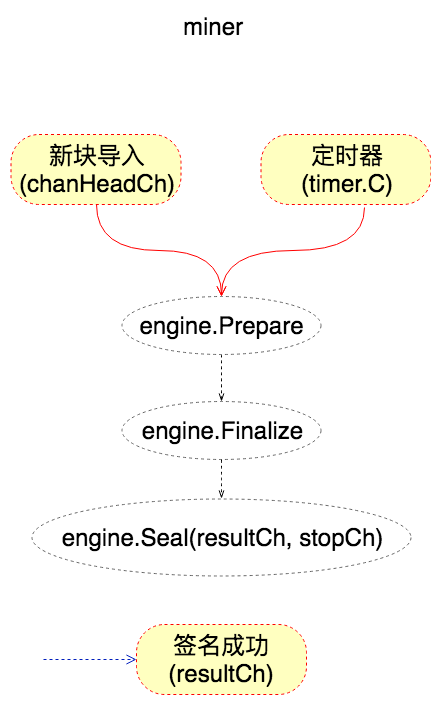
可以看到挖矿时,对于ethash模块来说,Ethash.Prepare、Ethash.Finalize和Ethash.Seal会依次被调用。Ethash.Prepare用来计算和填充Header.Difficulty字段;Ethash.Finalize用来计算当前state对象的哈希(以太坊state对象可以理解为一个保存了所有账户信息的KV数据库,我们以后会进行介绍),也比较简单。所以这一小节里,我们重点介绍Ethash.Seal方法。
我们先看一下Ethash.Seal经过精简后的代码:
func (ethash *Ethash) Seal(chain consensus.ChainReader, block *types.Block, results chan<- *types.Block, stop <-chan struct{}) error {
  threads := ethash.threads
  if threads == 0 {
    threads = runtime.NumCPU()
  }

  // Push new work to remote sealer
  if ethash.workCh != nil {
    ethash.workCh <- &sealTask{block: block, results: results}
  }

  var (
    pend   sync.WaitGroup
    locals = make(chan *types.Block)
  )
  for i := 0; i < threads; i++ {
    pend.Add(1)
    go func(id int, nonce uint64) {
      defer pend.Done()
      ethash.mine(block, id, nonce, abort, locals)
    }(i, uint64(ethash.rand.Int63()))
  }

  go func() {
    ...... //从locals、stop和ethash.update三个channal中等待通知,停止,或成功或重新挖

    // Wait for all miners to terminate and return the block
    pend.Wait()
  }()
  return nil
}
Ethash.Seal方法创建了多个线程同时挖矿,然后等待结果。注意Ethash.Seal不会阻塞,因为不管是挖矿还是等待结果都是在单独的goroutine中。这段代码虽然稍繁锁但并不复杂,挖矿工作主要调用Ethash.mine实现的。因此我们马上看一下Ethash.mine精简的代码:
func (ethash *Ethash) mine(block *types.Block, id int, seed uint64, abort chan struct{}, found chan *types.Block) {
  // Extract some data from the header
  var (
    header  = block.Header()
    hash    = ethash.SealHash(header).Bytes()
    target  = new(big.Int).Div(two256, header.Difficulty)
    number  = header.Number.Uint64()
    dataset = ethash.dataset(number, false)
  )
  // Start generating random nonces until we abort or find a good one
  var (
    attempts = int64(0)
    nonce    = seed
  )

search:
  for {
    select {
      case <-abort:
        break search

      default:
        // Compute the PoW value of this nonce
        digest, result := hashimotoFull(dataset.dataset, hash, nonce)
        if new(big.Int).SetBytes(result).Cmp(target) <= 0 {
          // Correct nonce found, create a new header with it
          header = types.CopyHeader(header)
          header.Nonce = types.EncodeNonce(nonce)
          header.MixDigest = common.BytesToHash(digest)

          // Seal and return a block (if still needed)
          select {
          case found <- block.WithSeal(header):
          case <-abort:
          }

          break search
        }

        nonce++
    }
  }
}
可以看到在这段代码的关键是最后的for循环,它不断地更改nonce变量的值,然后调用hashimotoFull计算哈希,看是否满足要求。我觉得这里有几个地方稍微留意一下即可:
target变量的计算方式hashimotoFull的参数中,hash变量代表的是header的哈希,一直保存不变。nonce变量每次都会加1。hashimotoFull返回后result变量的有效性判断- 如果哈希有效,则将
nonce和digest变量都保存在header中。
真正计算哈希的代码在hashimotoFull函数中,以下是hashimotoFull的代码:
func hashimotoFull(dataset []uint32, hash []byte, nonce uint64) ([]byte, []byte) {
	lookup := func(index uint32) []uint32 {
		offset := index * hashWords
		return dataset[offset : offset+hashWords]
	}
	return hashimoto(hash, nonce, uint64(len(dataset))*4, lookup)
}
这个函数比较简单,主要功能全在hashimoto中完成,hashimotoFull中只是提供了一个lookup函数,在给定索引后,可以直接从dataset数据中中读取相应的item并返回。注意这里dataset变量虽然是[]uint32类型,但虽然实际含义是一个哈希类型的数组(hashWords代表一个哈希类型的数据有多少个uint32)。
接下来我们看看hashimoto,这个函数比较长,所以我们分段来看。开始的部分代码如下:
func hashimoto(hash []byte, nonce uint64, size uint64, lookup func(index uint32) []uint32) ([]byte, []byte) {
  // Calculate the number of theoretical rows (we use one buffer nonetheless)
  rows := uint32(size / mixBytes)

  // Combine header+nonce into a 64 byte seed
  seed := make([]byte, 40)
  copy(seed, hash)
  binary.LittleEndian.PutUint64(seed[32:], nonce)
  seed = crypto.Keccak512(seed)
  seedHead := binary.LittleEndian.Uint32(seed)

  //使用seed初始化mix
  mix := make([]uint32, mixBytes/4)
  for i := 0; i < len(mix); i++ {
    mix[i] = binary.LittleEndian.Uint32(seed[i%16*4:])
  }

  ......
}
开始的部分首先利用hash(区块头哈希)和nonce生成一个seed。然后使用这个seed对mix变量作初始化。注意这个mix就是就是函数最终要计算的值。
接下来的代码使用dataset中的数据“强化”mix:
func hashimoto(hash []byte, nonce uint64, size uint64, lookup func(index uint32) []uint32) ([]byte, []byte) {
  ......

  temp := make([]uint32, len(mix))
  for i := 0; i < loopAccesses; i++ {
    parent := fnv(uint32(i)^seedHead, mix[i%len(mix)]) % rows
    for j := uint32(0); j < mixBytes/hashBytes; j++ {
      copy(temp[j*hashWords:], lookup(2*parent+j))
    }
    fnvHash(mix, temp)
  }

  ......
}
这段代码中,parent变量是由i、seedHead、mix计算所得。注意parent变量的随机性和确定性。随机性是由于seedHead和mix都是由seed计算所得,而seed又是由hash(区块头哈希)和nonce计算所得。所以在确定hash和nonce之前,parent变量的值在每次计算时是不能确定的;而一旦确定了hash和nonce之后,parent的值在每次计算时又肯定是确定的。
上面这段代码已经计算完成了,接下来的代码就是整理mix以及计算相应的哈希值并返回:
func hashimoto(hash []byte, nonce uint64, size uint64, lookup func(index uint32) []uint32) ([]byte, []byte) {
  ......

  for i := 0; i < len(mix); i += 4 {
    mix[i/4] = fnv(fnv(fnv(mix[i], mix[i+1]), mix[i+2]), mix[i+3])
  }
  mix = mix[:len(mix)/4]

  digest := make([]byte, common.HashLength)
  for i, val := range mix {
    binary.LittleEndian.PutUint32(digest[i*4:], val)
  }
  return digest, crypto.Keccak256(append(seed, digest...))
}
最终返回的是digest和digest与seed的哈希;而digest其实就是mix的[]byte形式。在前面Ethash.mine的代码中我们已经看到使用第二个返回值与target变量进行比较,以确定这是否是一个有效的哈希值。
下面我们把刚才这几段代码合在一起,从整体上看一下hashimoto函数:
func hashimoto(hash []byte, nonce uint64, size uint64, lookup func(index uint32) []uint32) ([]byte, []byte) {
  // Calculate the number of theoretical rows (we use one buffer nonetheless)
  rows := uint32(size / mixBytes)

  // Combine header+nonce into a 64 byte seed
  seed := make([]byte, 40)
  copy(seed, hash)
  binary.LittleEndian.PutUint64(seed[32:], nonce)
  seed = crypto.Keccak512(seed)
  seedHead := binary.LittleEndian.Uint32(seed)

  //使用seed初始化mix
  mix := make([]uint32, mixBytes/4)
  for i := 0; i < len(mix); i++ {
    mix[i] = binary.LittleEndian.Uint32(seed[i%16*4:])
  }

  //使用dataset中的数据“强化”mix,注意parent变量的“随机性”
  temp := make([]uint32, len(mix))
  for i := 0; i < loopAccesses; i++ {
    parent := fnv(uint32(i)^seedHead, mix[i%len(mix)]) % rows
    for j := uint32(0); j < mixBytes/hashBytes; j++ {
      copy(temp[j*hashWords:], lookup(2*parent+j))
    }
    fnvHash(mix, temp)
  }

  //计算完成,下面是对数量进行整理
  for i := 0; i < len(mix); i += 4 {
    mix[i/4] = fnv(fnv(fnv(mix[i], mix[i+1]), mix[i+2]), mix[i+3])
  }
  mix = mix[:len(mix)/4]

  digest := make([]byte, common.HashLength)
  for i, val := range mix {
    binary.LittleEndian.PutUint32(digest[i*4:], val)
  }
  return digest, crypto.Keccak256(append(seed, digest...))
}
多节点远程挖矿
不知道读者注意到没有,在Ethash.Seal方法中有这样几行代码:
func (ethash *Ethash) Seal(chain consensus.ChainReader, block *types.Block, results chan<- *types.Block, stop <-chan struct{}) error {
  ......

  // Push new work to remote sealer
  if ethash.workCh != nil {
    ethash.workCh <- &sealTask{block: block, results: results}
  }

  ......
}
根据代码中的注释,是将签名工作推送给远程的签名者。这里“签名”也就是“挖矿”,所以这相当于可以存在(当workCh不为空时)其它一些资源为自己挖矿。但这种机制是如何工作的呢?
在ethash模块的New函数的末尾创建了一个goroutine,它执行的是Ethash.remote的代码。正是这个方法在接收workCh管道的消息。我们看一下Ethash.remote中与这部分相关的代码:
func (ethash *Ethash) remote(notify []string, noverify bool) {
  ......

  ticker := time.NewTicker(5 * time.Second)
  defer ticker.Stop()

  for {
    select {
    case work := <-ethash.workCh:
      // Update current work with new received block.
      // Note same work can be past twice, happens when changing CPU threads.
      results = work.results

      makeWork(work.block)

      // Notify and requested URLs of the new work availability
      notifyWork()

      ......
    }
  }
}
可以看到Ehhash.remote在收到消息以后,调用了makeWork和notifyWork两个函数。这两个函数都是定义在Ethash.remote内部的匿名函数,为了更清晰的进行说明,我们把这俩函数拿了出来。我们先看一下makeWork的主要代码:
makeWork := func(block *types.Block) {
  hash := ethash.SealHash(block.Header())

  currentWork[0] = hash.Hex()
  currentWork[1] = common.BytesToHash(SeedHash(block.NumberU64())).Hex()
  currentWork[2] = common.BytesToHash(new(big.Int).Div(two256, block.Difficulty()).Bytes()).Hex()
  currentWork[3] = hexutil.EncodeBig(block.Number())

  // Trace the seal work fetched by remote sealer.
  currentBlock = block
  works[hash] = block
}
在makeWork的功能就是将信息存入currentWork、currentBlock、works为三个变量中。其中存入currentWork的信息有:
- hash(区块头的哈希)
- seed hash
- target(two256/Difficulty)
- block.Number(区块高度)
然后我们再看看notifyWork函数:
notifyWork := func() {
  work := currentWork
  blob, _ := json.Marshal(work)

  for i, url := range notify {
    // Terminate any previously pending request and create the new work
    if notifyReqs[i] != nil {
      notifyTransport.CancelRequest(notifyReqs[i])
    }
    notifyReqs[i], _ = http.NewRequest("POST", url, bytes.NewReader(blob))
    notifyReqs[i].Header.Set("Content-Type", "application/json")

    // Push the new work concurrently to all the remote nodes
    go func(req *http.Request, url string) {
      res, err := notifyClient.Do(req)
    }(notifyReqs[i], url)
  }
}
这个函数的功能就是将currentWork中的信息通过http协议发送出去。发送到哪呢?可以看到url信息存储在notify变量中。这个变量的值是在调用ethash模块的New函数中传入的。最终我们会发现,在配置文件中的MinerNotify字段和geth程序的--miner.notify参数,都可以对这个值进行设置。
另外在api.go文件中,还定义了两个方法:api.GetWork和api.SubmitWork,这两个方法对应着以太坊rpc协义中的eth_getWork和eth_submitWork。其中api.GetWork可以用来获取刚才currentWork变量中的信息;而如果某台机器拿到这个信息且“挖到矿”以后,可以通过api.SubmitWork将有效的Nonce值和MixDigest值提交。在Ethash.remote中有代码接收到提交的信息以后,如果验证通过,则此次挖矿成功。
可以看到,通过Ethash.remote、eth_getWork和eth_submitWork的配合,可以在挖矿时将信息提交到别的节点协同挖矿。其实这就是一个简单的支持矿池挖矿的基础功能。说到这里不得不提一下stratum协议,这是一个支持矿池挖矿的完整的协议,但以太坊并不支持这个协议,而是仅仅提供了简单的eth_getWork和eth_submitWork接口。因此有人在此基础上开发了以太坊的stratum协议,比如这个。
验证
挖矿信息的验证有两部分,一是验证Header.Difficulty是否正确;二是基于Header.Difficulty验证Header.MixDigest和Header.Nonce是否正确。
验证Header.Difficulty的代码主要在Ethash.verifyHeader中:
func (ethash *Ethash) verifyHeader(chain consensus.ChainReader, header, parent *types.Header, uncle bool, seal bool) error {
  ......

  // Verify the block's difficulty based in it's timestamp and parent's difficulty
  expected := ethash.CalcDifficulty(chain, header.Time.Uint64(), parent)

  if expected.Cmp(header.Difficulty) != 0 {
    return fmt.Errorf("invalid difficulty: have %v, want %v", header.Difficulty, expected)
  }

  ......
}
前面在分析Header.Difficulty的计算方法时我们已经说过,这个值的计算只用到了区块的高度和时间差,且所有计算是确定性的。因此在进行验证时,我们使用同样的方法和参数再次计算Difficulty值,然后与待验证的区块的Header.Difficulty字段进行比较,如果相等则认为是正确的。
MixDigest和Nonce的验证主要是在Header.verifySeal中进行的。验证的方式也是使用Header.Nonce和头部哈希通过hashimoto重新计算一遍MixDigest和result哈希值。之前我们也说过,在确定Nonce和头部哈希确定的情况下,计算出来的结果应该每次都是一致的。
另外验证的节点可以没有dataset数据。如果没有则会调用hashimotoLight在计算时生成所需要的item。
Header.verifySeal的主要代码如下:
func (ethash *Ethash) verifySeal(chain consensus.ChainReader, header *types.Header, fulldag bool) error {
  // Recompute the digest and PoW values
  number := header.Number.Uint64()

  var (
    digest []byte
    result []byte
  )
  // If fast-but-heavy PoW verification was requested, use an ethash dataset
  if fulldag {
    dataset := ethash.dataset(number, true)
    if dataset.generated() {
      digest, result = hashimotoFull(dataset.dataset, ethash.SealHash(header).Bytes(), header.Nonce.Uint64())

      // Datasets are unmapped in a finalizer. Ensure that the dataset stays alive
      // until after the call to hashimotoFull so it's not unmapped while being used.
      runtime.KeepAlive(dataset)
    } else {
      // Dataset not yet generated, don't hang, use a cache instead
      fulldag = false
    }
  }
  // If slow-but-light PoW verification was requested (or DAG not yet ready), use an ethash cache
  if !fulldag {
    cache := ethash.cache(number)

    size := datasetSize(number)
    if ethash.config.PowMode == ModeTest {
    size = 32 * 1024
    }
    digest, result = hashimotoLight(size, cache.cache, ethash.SealHash(header).Bytes(), header.Nonce.Uint64())

    // Caches are unmapped in a finalizer. Ensure that the cache stays alive
    // until after the call to hashimotoLight so it's not unmapped while being used.
    runtime.KeepAlive(cache)
  }

  // Verify the calculated values against the ones provided in the header
  if !bytes.Equal(header.MixDigest[:], digest) {
    return errInvalidMixDigest
  }
  target := new(big.Int).Div(two256, header.Difficulty)
  if new(big.Int).SetBytes(result).Cmp(target) > 0 {
    return errInvalidPoW
  }
  return nil
}
其它
Ethash.shared
在Ethash结构体中有一个shared字段,当调用ethash模块的NewShared函数时,会被设置为模块的全局变量sharedEthash。在Ethash的一些方法中(如Seal),如果shared字段不为空,则会调用shared指向的对象的对应的方法。也就是说在一些方法中所有调用都使用同一个对象完成。
这里有一个问答解释了shared字段存在的意义。简单来说其实是为了测试用的,没有实际用处。(原问答中写答案的人引用的应该是这里)
总结
这篇文章我们从代码细节入手,解释了ethash的一些关键功能的实现。这主要包括动态调整难度值、如何生成cache数据和dataset数据、如何挖矿以及如何验证。
在以太坊以后的版本中,ethash应该会被实现了PoS共识的模块替换掉,但这不会阻挡我们学习其实现的热情。尤其是它的“困难炸弹”和“Dagger-Hashimoto”,我觉得是非常有意思的想法和实现。
如果文章中有不对的地方,欢迎读者不吝指正。